Detailed Notes on wiring a ceiling light with 2 wire
Are you looking for guidance concerning wiring a ceiling light?You'll commonly see us refer to 2-wire and also 3-wire lights systems. This is a crucial point as lots of items, such as relays, can not work if mounted right into a 2-wire system.
This application note explains the difference in between 2-wire as well as 3-wire lights systems as well as assists you recognize which version you have in your installation.
First of all, what do we mean by 2-wire and also 3-wire systems. The simple description is that a 2-wire system does not consist of a Neutral cable at the light switch, the 3-wire system does consist of the Neutral at the switch.
2-wire Lighting Systems
This is one of the most usual lights system in Europe, almost all houses use this system, specifically in the UK as well as Nordic areas.
The term is slightly complex as the system will actually include 3 cords. Nevertheless, the third wire, which usually has a green/yellow sleeve is the Earth cord. The Earth is an extremely vital part of the electrical system and all switches, home appliances and lights have to be appropriately earthed. But also for the purpose of simpleness we neglect the Earth cable when describing electrical wiring as it plays no active function in the everyday operations of your light circuits.

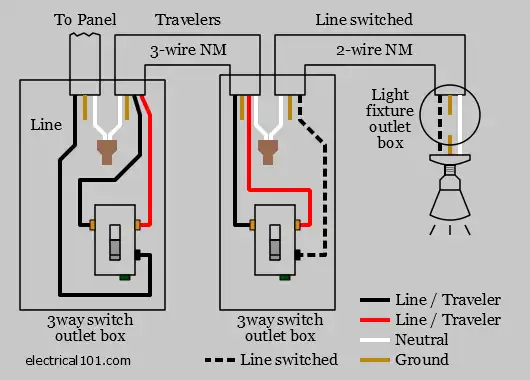
3-wire Lights Systems
The 3-wire system is much less common than the 2-wire system, it includes a Neutral at the button in addition to the Live and also Switched Live wires.
An example of a 3-wire illumination circuit is shown in Number 2. One '2-Core + Planet' cable television takes Live as well as Neutral to the button back box, a 2nd cable television takes the Neutral and also Switched Live to the light.
Keep in mind - the Neutral is not connected to the actual switch, both Neutrals are linked with each other utilizing a connector block.
How do I know which system I have?
As the 2-wire system is one of the most usual, it's most likely best to begin with the assumption that you have a 2-wire system, specifically if you're in the UK or if your house is greater than 3-5 years old.
You can inspect the complying with points:
• Are all the cords attached to the button?
• Do all the wires have a brownish sleeve on them?
• If the solution is YES to either of these points, you have a 2-wire system
• Do you have two blue, black or grey cords mosting likely to a port block? If so you MAY have a 3-wire system, but you need to confirm this with a voltage meter or consult a certified electrical contractor.

A Word of Caution
Shut down the breaker controlling the light and fan circuit. This is the single crucial part of any kind of house wiring treatment. Even after turning off the breaker, it's still an excellent idea to use a voltage tester to evaluate the cord connections before you service them.
You'll Require to Make Pigtails
In electric job, a pigtail is a collection of wires entwined together with a short length of wire. The pigtail allows you to link all the wires to a single terminal. The secret to making an efficient one is to turn the cables with each other clockwise-- not counterclockwise-- prior to screwing on the cap. That way, the clockwise strings of the cap make the link tighter when you screw it on.
Transforming From 2 Buttons in the Very Same Box to One Switch Over
Disconnect both black wires from both switches. If you don't know which one supplies power to each switch, turn the power back on and examine the wires by connecting each to ground with your voltage tester. The real-time circuit cords will certainly offer you an analysis as well as the others will not. Turn the breaker withdraw when you know which is which.
Make a pigtail with both live wires as well as a brief length of black wire of the same gauge. Attach the brief wire to the leading terminal of the button you wish to use. Do the exact same with both various other cords, and also link them to the bottom terminal of the button.
Loosen the cap from both white cables serving the button you're no longer making use of, include a brief length of white cord of the very same scale as well as screw the cap back on make a pigtail. You might need a larger cap than the one that was on there. Splice the various other end of the brief cord to the two white cords offering the brand-new switch. If you want, you can additionally just splice all four white wires with each other under the very same cap, yet you might find that difficult to do with 4 cords.
Eliminate the ground from the out-of-service switch and the one from the button you're making use of. Link them by twisting them with each other or utilizing a kink ring, then affix them to the environment-friendly ground terminal on the button you're using.
Linking a Light as well as Fan to a New Switch
Find the switch cable television, which need to be sticking with the top or side of package serving the follower or light. Utilizing cord strippers, strip an inch of insulation from completion of the black and white cables. Splice the black cable from the follower along with the black wire from the light as well as the black cord from the button, and cap them. Link the white cords together similarly, then repeat with the ground cords. When you splice ground wires, you don't need to top them, yet it's still an excellent idea to do so since the cap helps maintain them with each other. Mount the follower and light as well as relocate to the switch box.
Connect the black cable from the fan to the bottom terminal of the button and also the live circuit wire to the top terminal. Mate the white cables together as well as top them. Spin the ground cables together as well as link them to the eco-friendly ground screw on the switch.
I stumbled upon that blog posting about when doing a search on the web. Don't hesitate to take the opportunity to promote this blog post if you enjoyed reading it. Thanks a bunch for being here. Revisit us soon.
This is why you want to enlist the help of somebody. Your Do it yourself ceiling wiring undertaking will go a whole lot smoother and quicker if you can get someone that can assist you change your fixture.
If you have to wire a light fixture with two black wires, your initial step is identifying which wire is which. It’s best to test the fixture initially right before executing an entire substitute, so that you don’t really have to probably uninstall the fixture.
Make sure that you feed the wires coming in the ceiling with the center gap from the bracket. Make use of the screwdriver to make sure that the screws are limited so that your lover won't wobble when it will get turned on at the conclusion of the day.
And seeking these kinds of easy installation initiatives by you is an excellent method to skip All those pointless paying on using the services of an electrician. Also, it’s not difficult if you obtain to know The complete procedure very well. So, give it a try and maybe you’ll go to be a able handyman.
The crimson and brown tape to the swap live side of the circuit in Every single state of affairs graphic over is demonstrated. from this source Excellent luck with your task and remember to stay Safe and sound.
With the wire finishes stripped, it is possible to prefer to put on a pair of protecting gloves to prevent by yourself from sustaining any cuts within the copper ends in the wires.
Connect the electrical wire towards your source of ability using the pliers and wire nuts and fish it from the joists until it reaches the light change. Protected the wire for the joists with electric powered staples.
Attempt getting rid of it to find out if it solves your difficulty. If not, you'll be able to often place it back again in. To remove the limiter:
Take down the previous ceiling light employing a Phillips screwdriver to unscrew the mounting screws. This method will probably be less of a challenge When you have somewhat aid.
It will often depend on the actual space, the ceiling's peak, and the kind of light fittings installed. Exactly what are some great benefits of picking out LED lighting above traditional lighting?
Ahead of we leap into the actual course of action, in this article’s something intriguing. This wiring can be achieved in two approaches. You could install the ceiling lover and light wired to two separate switches.
Therefore if both of those lights perform fine but your enthusiast just doesn’t begin spinning, then likelihood is you need to exchange a wire concerning exactly where they connect to either your property’s electrical process or its junction box up above.
You may have noticed that fairly little seedy glass pendant light over our sink from my video one other working day. It was a breeze to install, so I wish to share with you the tutorial.
Turn on a nearby light resource so as to ensure that there aren't any unfastened connections everywhere in the program.